Title: The Ultimate KVM Switch Setup: Dual DisplayPort 1.4 Monitors Shared Between MacBook Pro and Gaming PC!
SEO Meta-Description: Discover the ultimate KVM switch setup for seamlessly sharing dual DisplayPort 1.4 monitors between your MacBook Pro and Gaming PC. Learn how to enhance productivity and gaming experiences with this step-by-step guide!
Introduction
Hey there tech-savvy folks and gamers alike! Are you tired of the hassle of constantly switching cables between your MacBook Pro and Gaming PC to use your dual DisplayPort 1.4 monitors? Well, worry no more! We've got the ultimate solution for you – an advanced KVM switch setup! This magical device will allow you to share your high-resolution monitors between your MacBook Pro and Gaming PC with ease.
Let's dive right in and explore the step-by-step process of setting up the Ultimate KVM switch for sharing dual DisplayPort 1.4 monitors between your MacBook Pro and Gaming PC. Get ready to level up your productivity and gaming experience in just a few simple steps!
Why the Ultimate KVM Switch Setup?
Before we jump into the nitty-gritty of setting up the KVM switch, let's take a moment to understand why it's the ultimate choice for dual DisplayPort 1.4 monitor sharing:
-
Effortless Multitasking: With the KVM switch, you can switch between your MacBook Pro and Gaming PC at the press of a button, making multitasking a breeze. No more tedious plugging and unplugging!
-
Enhanced Productivity: Whether you're a professional working on your MacBook Pro or a gamer enjoying your Gaming PC, the KVM switch lets you streamline your workspace, minimizing clutter, and maximizing efficiency.
-
Simplified Gaming: Love gaming on your PC but miss your MacBook Pro's versatility? With the KVM switch, you can effortlessly switch to your MacBook Pro without disconnecting your PC setup!
-
Cost-Effective Solution: Investing in a KVM switch eliminates the need for purchasing separate monitors for each device, saving you money while providing a seamless setup.
The Ultimate KVM Switch Setup: Step-by-Step Guide
Enough chitchat! Let's get down to business and set up the ultimate KVM switch to share your dual DisplayPort 1.4 monitors between your MacBook Pro and Gaming PC. Here's what you'll need:
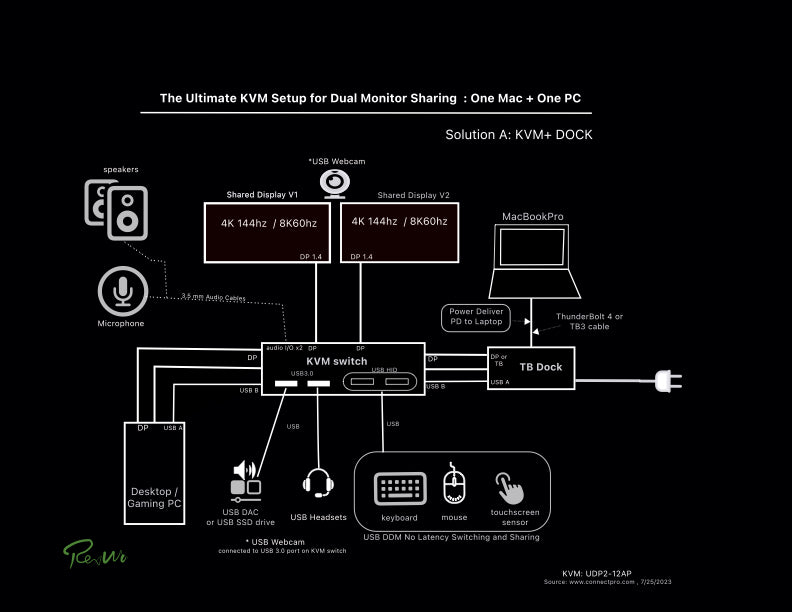
Materials Required
- A reliable KVM switch with dual DisplayPort 1.4 input/output ports.
- Appropriate DisplayPort cables (quantity depends on the number of monitors). For 4K144hz monitor, a fiber optic DP1.4 cable is recommended.
- A MacBook Pro and a Gaming PC, both equipped with DisplayPort 1.4 connectors. Since new MacBook Pro laptops don't have DisplayPort video ports on them, a Thunderbolt docking station should be added for dual DP1.4 video outputs and USB 3.0 A->B output to the KVM switch.
- Peripherals such as keyboards, mice, and other input devices for each computer.
- Your undivided enthusiasm and a dash of tech prowess!
Step 1: Choose the Right KVM Switch
Not all KVM switches are created equal, so it's crucial to find the perfect match for your needs. Look for a KVM switch that supports dual DisplayPort 1.4 monitors and is compatible with both your MacBook Pro and Gaming PC. Do some online research, read reviews, and make an informed decision.
Step 2: Connect the Monitors
-
Position your dual DisplayPort 1.4 monitors side by side on your desk or mount them using monitor arms for a sleek setup.
-
Connect one end of the DisplayPort cable to the first monitor and the other end to the KVM switch's DisplayPort output port 1.
-
Repeat the process for the second monitor, connecting it to the DisplayPort output port 2 of the KVM switch.
Step 3: Link the MacBook Pro and Gaming PC
-
Grab two more DisplayPort cables and connect one end of each cable to the DisplayPort input ports of your MacBook Pro (via the TB docking station/ docking hub) and Gaming PC.
-
Attach the other end of the cables to the DisplayPort input ports 1 and 2 on the KVM switch, ensuring the correct mapping with your monitors.
Step 4: Plug in Peripherals
-
Connect your keyboard and mouse to the dedicated USB input ports on the KVM switch.
-
For other peripherals like USB webcam, USB headsets, USB audio DAC, printers or external hard drives, utilize the additional USB ports on the KVM switch. (you even can add a 4-port USB 3.0 Hub to one of the USB 3.0 sharing hub port on the KVM switch to add more USB sharing ports for more sharing devices). ** Don't use any USB hubs with dedicated power charging ports on them!
Step 5: Power Up and Test
-
Once all the connections are in place, power up your MacBook Pro, Gaming PC, and the KVM switch.
-
Use the KVM switch's button or keyboard hotkeys to toggle between the MacBook Pro and Gaming PC inputs on your monitors. Voilà! You've got the ultimate KVM switch setup working flawlessly!
FAQs: Your Burning Questions Answered!
Q: Will the KVM switch support high refresh rates and resolutions on my monitors? A: Absolutely! A quality KVM switch will support the highest resolutions and refresh rates that your monitors and devices can handle, including those of DisplayPort 1.4. ( recommended an advanced DDM-class KVM switch: UDP2-12AP )
Q: Can I use the KVM switch for other devices, like my gaming console or work laptop? A: Unfortunately, no. KVM switches are designed specifically for computers and don't support gaming consoles or laptops without the necessary DisplayPort connections. So, you need an active HDMI to DisplayPort female converter/adapter to plug it into the HDMI video output port of your gaming console, make sure the active converter can support HDMI EDID throughput.
Q: Do I need to install special software to use the KVM switch? A: Most KVM switches work plug-and-play, so no additional software is required. Simply connect everything, and you're good to go!
Q: Can I share more than two monitors using a KVM switch? A: While some KVM switches do support more than two monitors, they can be quite expensive. For dual monitor setups, the KVM switch we've recommended should be perfect!
Conclusion
Congratulations, tech aficionados! You've successfully set up the ultimate KVM switch for sharing dual DisplayPort 1.4 monitors between your MacBook Pro and Gaming PC. Say goodbye to cable chaos and enjoy effortless multitasking and enhanced productivity, whether you're working or gaming.
Now that you've mastered this setup, you can truly appreciate the wonders of technology, simplifying your life in more ways than one. Embrace the power of the KVM switch, and let your creativity and gaming prowess flourish like never before!
3 comments
This setup had been also tested and proofed to work with two 5K (5120×1440) monitors (one LG 5K240Hz UltraGear DQHD 49GR85DC, one Dell 5K60 UltraSharp U4924DW).
Please check the reported and post from Reddit link :
https://www.reddit.com/r/desksetup/comments/18k2khg/unbox_lg_5k1440p_240hz_monitor_sharing_with/?utm_source=share&utm_medium=web2x&context=3
If you have just one monitor to be shared, you may not need to put a docking station between the laptop and the single monitor sharing KVM switch. The single monitor sharing for this ultimate setup recommended will be with UDP-12AP KVM switch.
The docking station can be a “not Thunderbolt” one. Users can use a cheaper Dell D6000, a DisplayLink-base docking station instead.
**f shared monitors required to have more than 4K60hz supported, then Dell D6000 is not recommended. Also if the MacBook Pro is provided by the work, it might be not allow adding the DisplayLink driver and installed on the MBP.
If users can not use Dell D6000, then a Thunderbolt 3/4 docking station should be used instead. We normally recommend OWC TB4 hub or CalDigit TS3 plus or TS4 to our users.